Symbol Lists
The Symbol List feature allows you to include or exclude certain stock symbols from your scans.
Create a new symbol list
The software offers two places to create a new Symbol List, you can go to the Toolbar, select Tools, and then Symbol Lists or create a Symbol List via right-click directly in the Symbol Lists Tab of the Config Window of your scan.
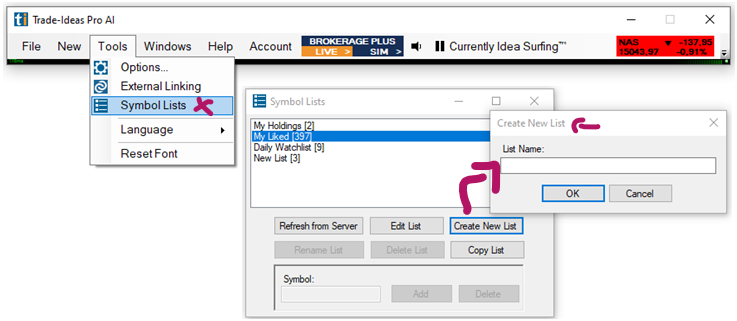
To Create a new Symbol List, go to the Toolbar, select Tools, and then Symbol Lists.
The field on the top left-hand side of the new window displays all the already existing Symbol Lists and the number of symbols they contain.
To create a new Symbol List, select Create New List on the bottom right-hand side.
Give your new list a name, then click OK.
Your newly created list will now appear in the Symbol List field.
Add single symbols to one or multiple Symbol List(s)
To quickly add or delete a single symbol, highlight the Symbol List, then enter the ticker in the Symbol Field in upper or lower case and click Add or Delete. The symbol will now be added to or removed from all the currently highlighted lists. The program will automatically remove duplicate symbols during addition and ignore any removal request if the symbol does not exist in the symbol list.
To select more than one list at once, press the control key on your keyboard while selecting the lists with your mouse.
Add multiple symbols to a Symbol List
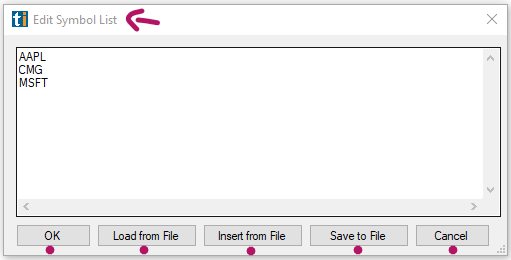
To add multiple symbols to your newly created Symbol List, double-click on your list to open it.
This will take you to another window where you can enter the stock symbols. There is no limit to the number of symbols you can add to a symbol list. The program automatically will convert the symbols to the upper case, remove duplicates and sort the list alphabetically.
Typing
You can enter stocks manually by typing.
Copy & Paste
You can copy & paste symbols from any document. The symbols should be added one line per symbol, in upper or lower case.
You can also copy & paste selected symbols or entire symbol columns from your scans. To do this, first go to the Toolbar, select Tools, Options, and then General. Here, uncheck Highlight grid row upon selection.
By default, the entire row is highlighted when you select a column in the scan. Unchecking this option will enable you to highlight individual columns.
Now, go to your scan and highlight the symbols you would like to add to your Symbol List.
Thereafter, copy the data by using the Windows copy command, pressing the Control and C keys on your keyboard.
Now, go back to your newly created Symbol List and paste the symbols into it using the Windows paste command, pressing the Control and V keys on your keyboard.
Upload from File
In addition to manually adding stock symbols, you also have the option to upload a text file from your local PC by choosing Load from File. Please note, that this will overwrite any already added symbols.
If you would like to upload additional symbols to an already existing Symbol List, choose the option Insert From File instead.
Download Symbol List to PC
To save a copy of your Symbol list to your local PC, select the Save to File option.
Once you have added your symbols, hit OK.
Edit, Copy, Rename or Delete a Symbol List
To edit a Symbol List, select the Edit List button, which will bring you back to the symbol entry window.
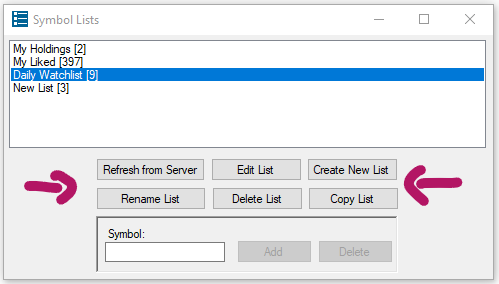
To copy a Symbol List, select the Copy List button. Type the name of the new symbol list and press the OK to copy the list and populate it with the symbols from the currently selected lists.
To rename the list, highlight it and select the Rename List button.
To delete a list, highlight it and select the Delete List button.
The Refresh from Server button is used to clear the cache and reload it with the symbol lists from the server. This operation is automatically performed upon application startup. Select this option to ensure syncing, whenever you have made changes to your symbol lists.
Include or Exclude Symbol Lists from Scans
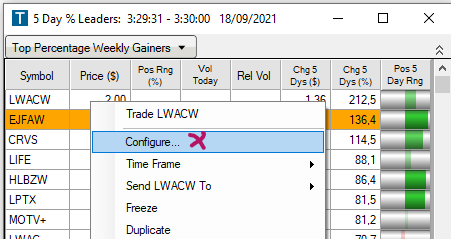
Now that we have our symbol list, we can go into our scan, to include or exclude the symbols it contains.
Right-click into your scan and select Configure.
Now, open the Symbol Lists Tab.
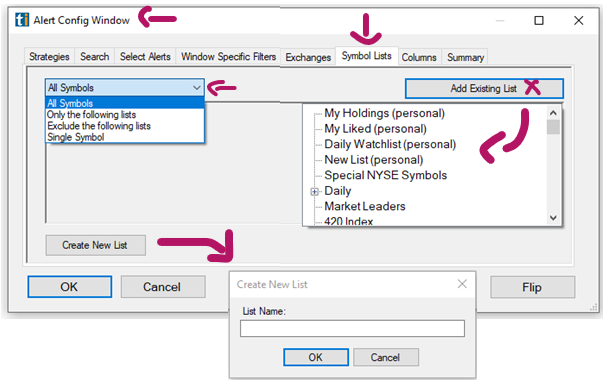
The newly created Symbol List will show up in the Drop-Down Menu of the Add Existing List Tab, located on the right side.
The Add Existing List dropdown not only displays your newly created Symbol Lists but a large variety of additional preconfigured Symbol Lists that we have created for our users. Of particular interest to many traders are symbol lists that include or exclude recent IPOs, ETFs, Warrants, or entire sectors.
Any already activated lists will be displayed in a different color.
Simply click on any Symbol List to add it to the section on the left-hand side.
Once you have selected all the symbol lists you would like to include or exclude, make a selection from the dropdown on the left-hand side.
By default, your scan is set to monitor All Symbols.
From the dropdown, you can select to show Only the following lists and check the symbol lists you would like to point your scan at below.
Alternatively, you can choose to Exclude the following lists and check the symbol lists you would like to exclude from your scan below.
You can also choose to only monitor a Single Symbol with your scan. To do so, select Single Symbol from the dropdown and enter the ticker in the field below.
To remove a Symbol list from the selection field, right-click on it and select Remove from this List.
The Config Window of your scan also gives you the option to Create a New List. The process is the same as described above.
Once you have made your selection, hit OK.
Then select OK one more time to save your changes and close the Config Window of your scan.
Add Symbols via the Send To Feature
To add more symbols to any of your existing symbol lists on the fly from any of your scans, just right-click into the scan, choose Send to and Symbol Lists. Thereafter, select a specific symbol list from the dropdown.
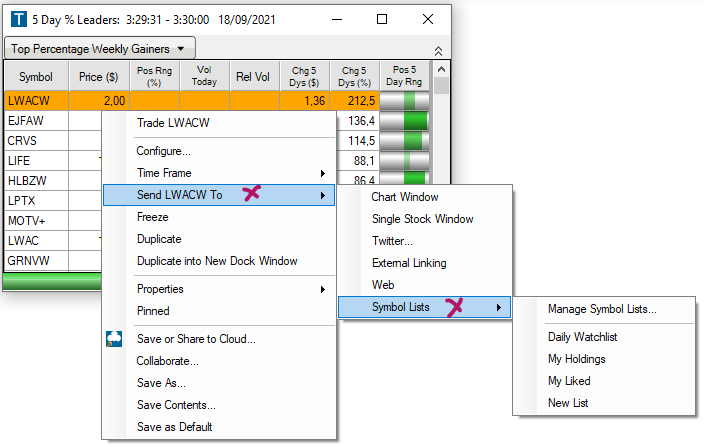
If you have recently sent a symbol to any of the lists, it will be bold. To remove this visual highlight, select Clear Recent List and click Yes.
To create an entirely new Symbol list, select the option Manage Symbol Lists from the dropdown. This will bring you to the main Symbol List Configuration Menu where you can create, edit, copy, rename and delete Symbol Lists.
In addition to accessing your Symbol Lists from within our software, you can also find them on your Account Management Page, on our Website. Here, you can also edit, delete or create entirely new symbol lists.