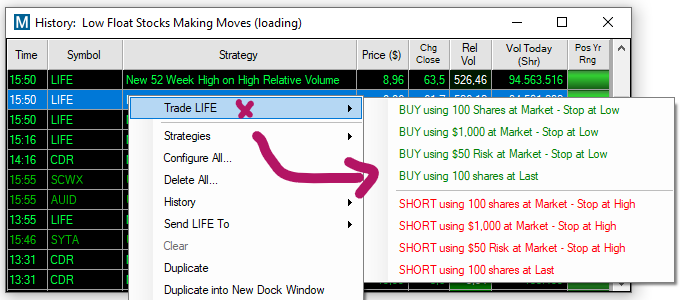
Create a Custom One-Click Order Entry Template
Our One-Click Order Feature enables you to trade stocks right from your scans and charts. Simply right-click into the scan or chart and select Trade XYZ to bring up a dropdown menu with preset order templates.
To create a custom Order Template defining Share Size, Stop Loss, and Target for our One-click Trading Feature, open the Strategies Tab within Brokerage Plus by selecting New and then Strategies Tab.
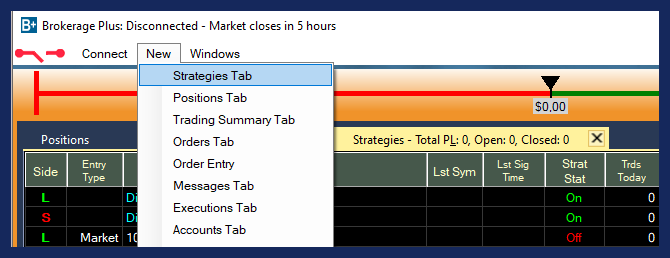
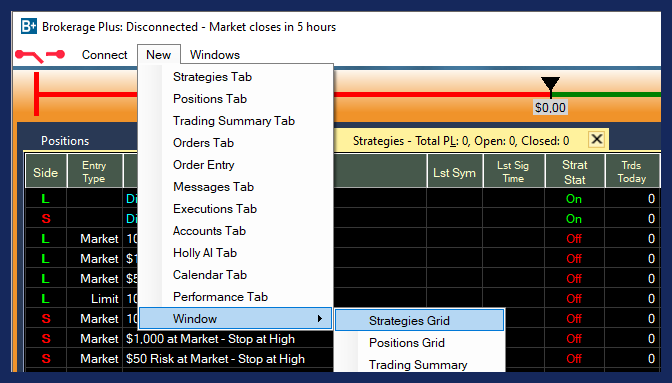
Alternatively, you can open the Strategies Tab or any other tab in separate Windows, by opening the Windows dropdown at the bottom of the New Tab menu and selecting the Grid version.
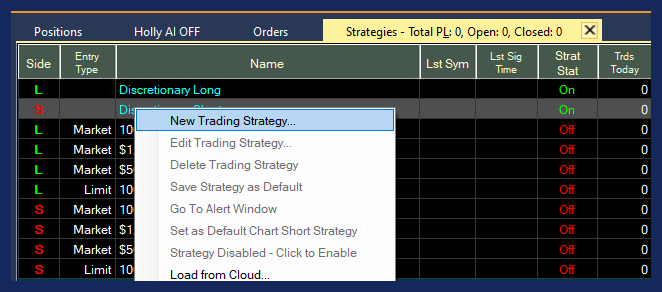
Right-click in the Strategies Tab and choose New Trading Strategy.
Configuration Tab
Please note, this Configuration Menu is also used to create trading instructions in order to automate strategies. The menu options that aren’t relevant for a simple One-Click Order Template will not be outlined in this section.
Give your Order Template a Name and choose its Direction. If you would like to buy stocks using the template, select Long, if you would like to borrow stocks to sell, choose Short.
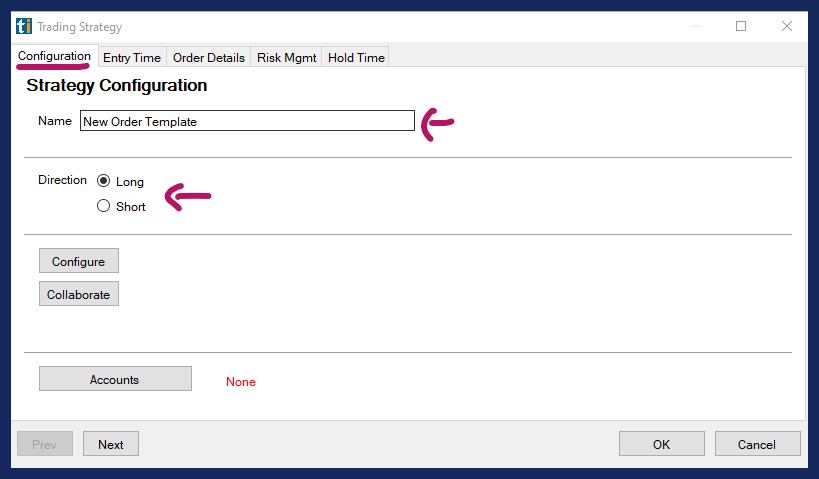
Next, select Accounts and choose Accounts as Allocation Type. Then, select your trading account. This will either be our in-house simulator or your account at a participating brokerage. Please note, that you have to connect to this account via the Connect Tab first for it to be displayed and ready to use.
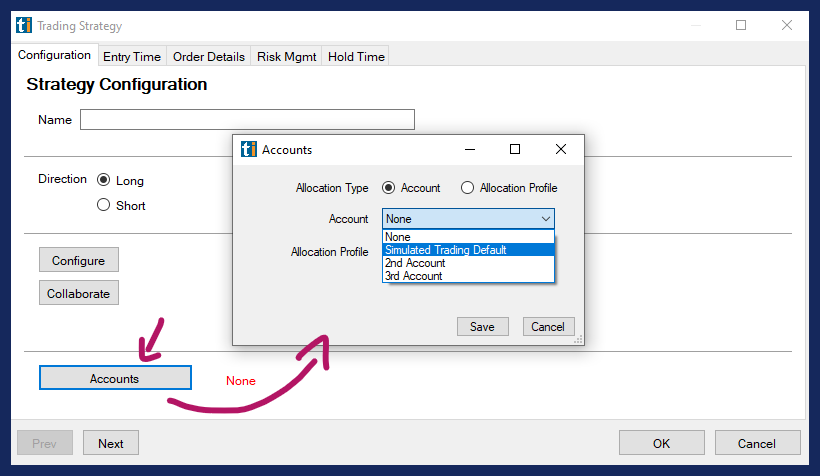
After choosing your account, hit Save.
Entry Time Tab
Now, head to the Entry Time Tab. These settings are more relevant for the automation of strategies. For a One-Click Order Entry Template set the Start Time to 9:30 am and the End Time to 4 pm.
Uncheck all the options, except Send orders even when holdings exist for symbols, which we recommend to leave checked.
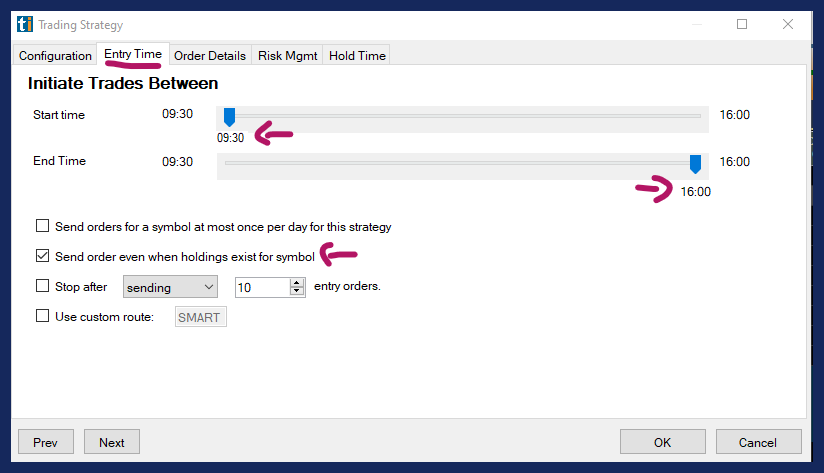
The option Use Custom Route is only relevant if you wish to execute your order on a specific route, like the ARCA or BATS. Leave it unchecked unless you have a reason to change the exchange route.
Order Details Tab
In the Order Details Tab, you can define your position sizing. You can base your position size on Fixed Dollars, Fixed Shares, or the total amount you would like to risk in terms of a Stop Loss. Our software will automatically calculate the other parameters, saving you time and effort.
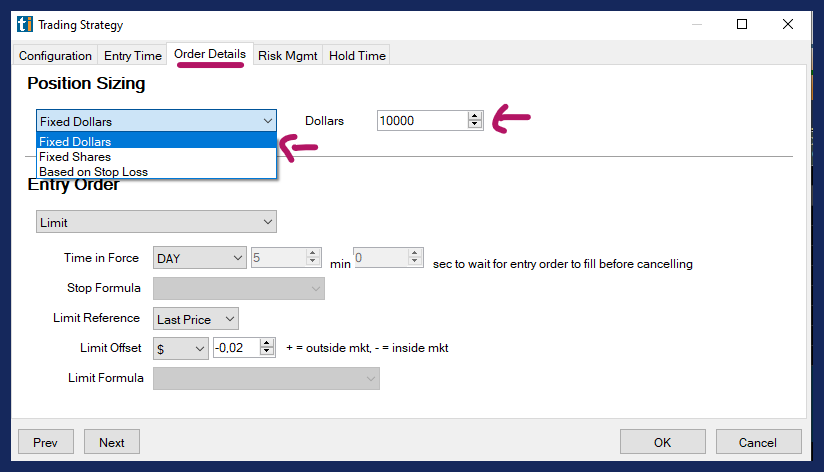
Next, you can select the Entry Order type.
In B+ Basics we recommend using either a Limit or a Market Order as your Entry Order type.
The options Stop Limit or Stop Entry Order will be discussed in B+ Intermediate. Only choose these entry order types if you are familiar with the use of filters and custom formulas in order execution.
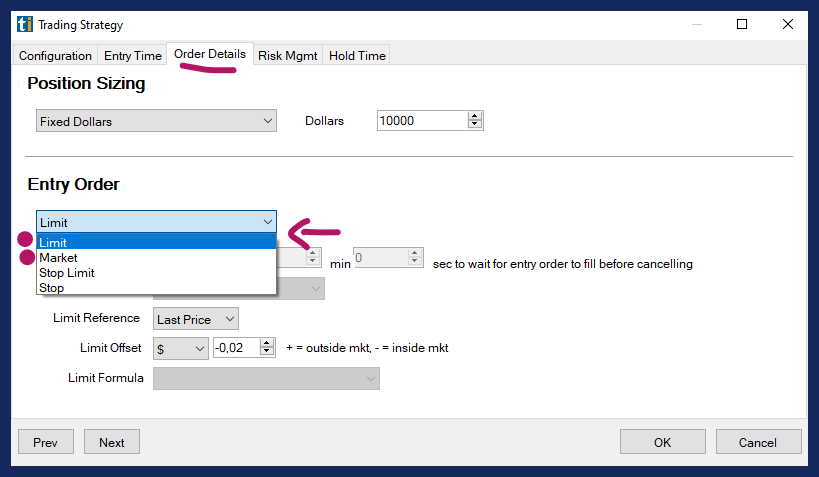
Choose a Limit Order, if you would like to keep tight control over the entry price, which is advisable, especially for new traders. Choose a Market Order, if getting into the trade is more important to you than the exact entry price.
A Limit Order is an order to buy or sell a stock at a specific price or better.
A Buy Limit Order can only be executed at the Limit Price or lower.
A Sell Limit Order can only be executed at the Limit Price or higher.
While limit orders do not guarantee execution, they help ensure that you do not pay more than the predetermined price for a stock.
A Market Order is an order to buy or sell a stock immediately at whichever price is available at this moment. Generally, this type of order will be executed immediately. Learn about Market Orders before making this choice and be particularly careful using this order type when trading fast-moving stocks and stocks with large spreads.
Time in Force defines when your open order gets canceled if it hasn’t been filled.
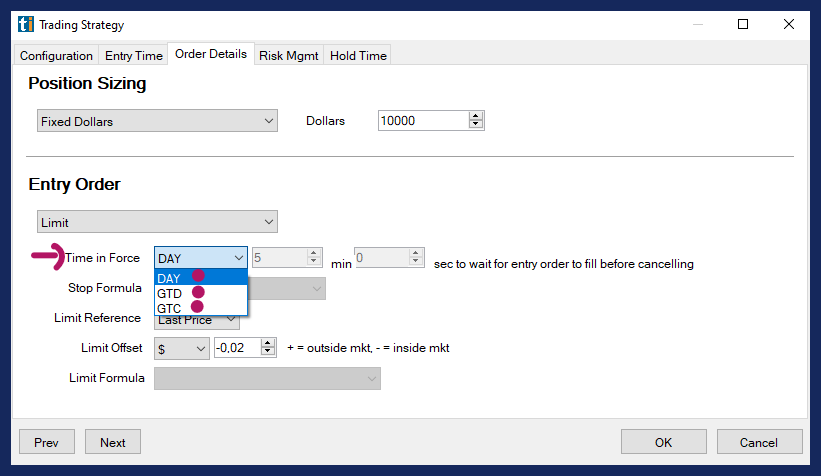
DAY means the order will stay open until the close of market on the given day.
GTD means Good Till Day. Select the number of minutes and seconds, you would like your order to stay open.
GTC which means Good Till Cancelled. If selected, your order will remain open, until you manually cancel it.
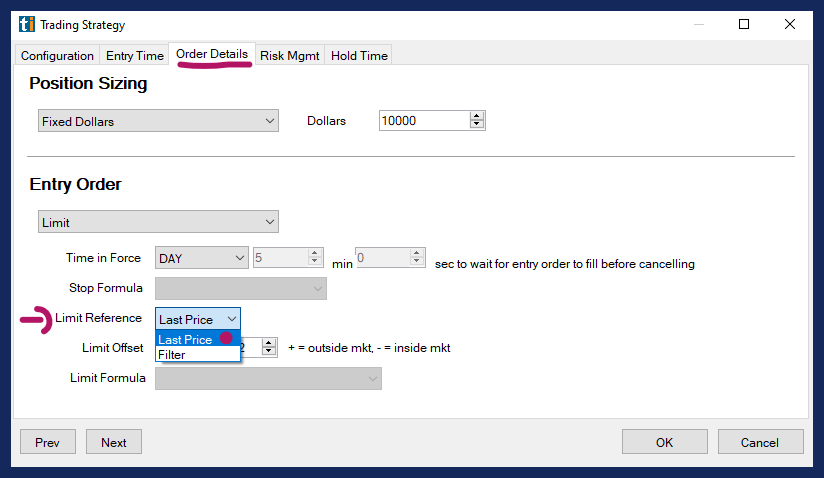
In B+ Basics we recommend using Last Price as Limit Reference. This means that your Limit Order will be submitted at the current price of the stock.
The Limit Offset gives you the ability to control how aggressive or passive your Entry Order will be, it simply allows a bit of wiggle room. If you set the Limit Offset to 0, you are stating that your limit price for the order will be the exact price of the alert.
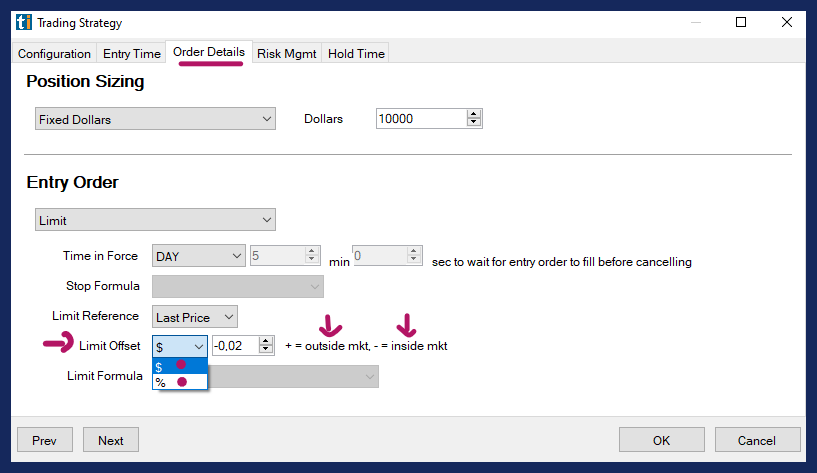
If you enter a negative Limit Offset, like - $0.02, you are prepared to pay up to 2 cents more per share (long) or 2 cents less (short). This approach is best for prioritizing the likelihood of being filled over a rigid price level.
If you enter a positive Limit Offset, like $ 0.01, you are waiting for the price of the stock to become 1 cent “cheaper” (long) or 1 cent higher (short). You are stating that you are prepared to wait for the stock price to move in your direction, rather than to pay a little extra to get in easier or quicker.
Please note, these rules are the same for long and short orders.
Risk Management Tab
The Risk Management Tab lets you define a Stop Loss or Trailing Stop and a Profit Target.
In B+ Basics we’ll discuss defining Stop Loss and Target Price in Dollars and in Percent.
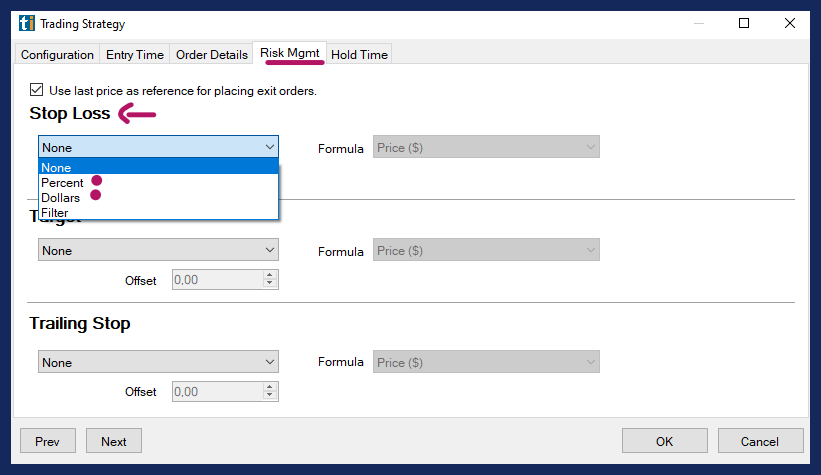
If you choose Dollars/per Share use the Offset to define the number. As an example, if you would like to use a 20 cent per share Stop Loss, enter 0.20 as the Offset.
If you choose Percent/per Share use the Offset to define the number. As an example, if you would like to use a 2% Trailing Stop, enter 2.00 as the Offset.
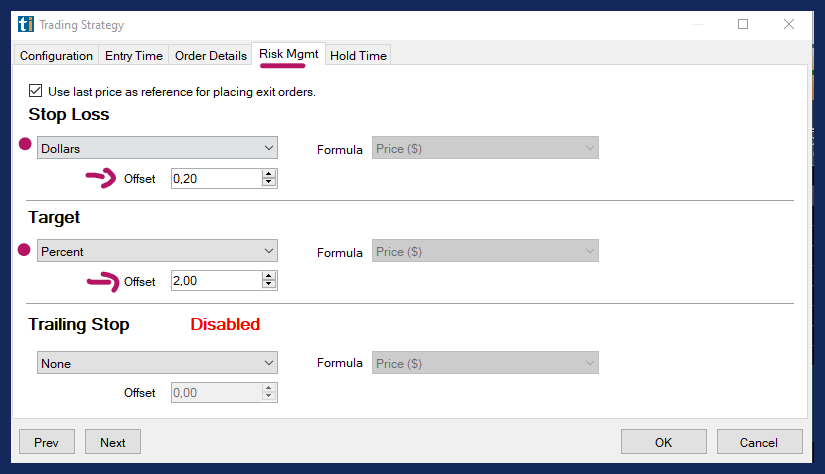
Within Brokerage Plus, you have to choose between placing a Stop Loss or a Trailing Stop, the other option will automatically be disabled. Having more than one stop can create various issues, e.g. double filling, that outweigh any potential benefits.
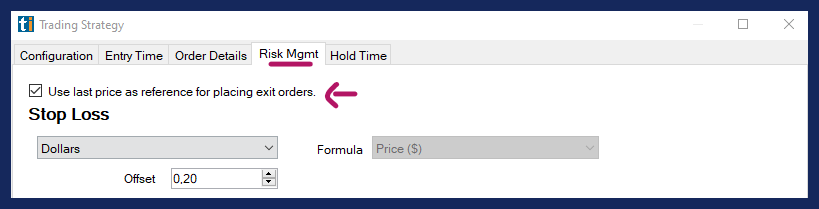
When the option “Use last price as reference for placing exit orders” is selected, your exit orders will be placed relative to the Last Price. The program will attempt to base the exit order on the Last Price at placement of the order. The actual fill price cannot be part of the calculation since exit orders are submitted as brackets orders together with the entry order.
When this option is unchecked, your exit orders will be placed relative to the order price or price that triggered the alert including the Offset. In B+ Basics we recommend leaving the option checked.
Hold Time Tab
The Hold Time Tab enables you to set a Timed Exit. Disable any Time Stop by choosing None or select an Intraday or a Multi-Day Time Stop.
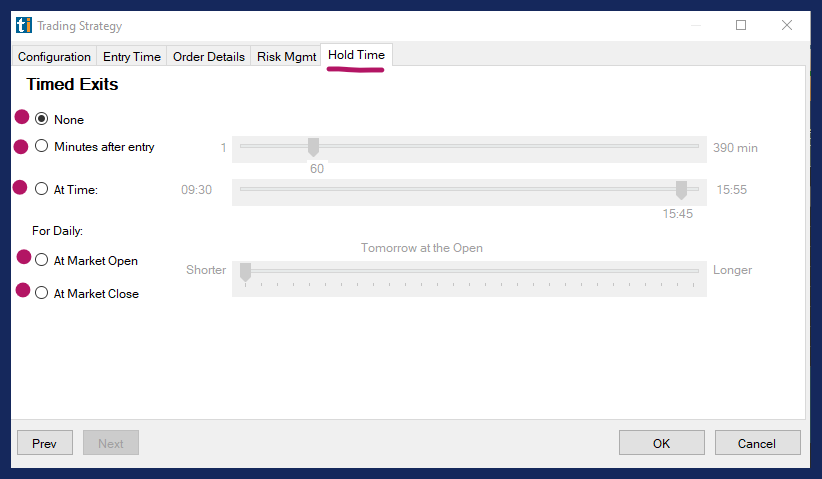
To close the trade and exit your position after a certain time period in minutes, select the option Minutes after entry and set your time.

Alternatively, you can define a specific time of day for your exit.

You can also choose an exit in relation to the open or close of the market. This option is particularly useful for swing traders who like to hold their position for longer periods of time.

Select OK once you have adjusted all your settings.
You will now see the newly created Order Template listed in the Strategies Tab of Brokerage Plus.
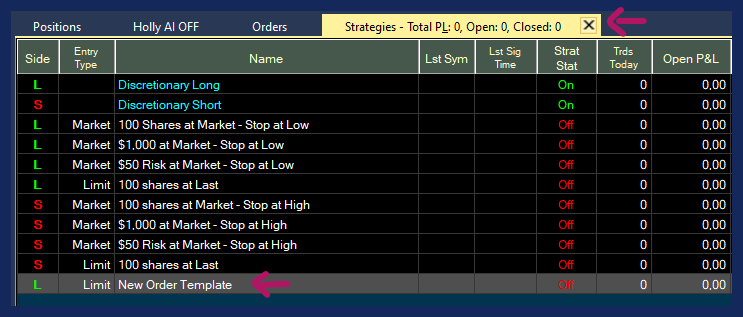
If you right-click into your scan or chart and select Trade, your newly created Order Template will be listed as an option in the dropdown menu.
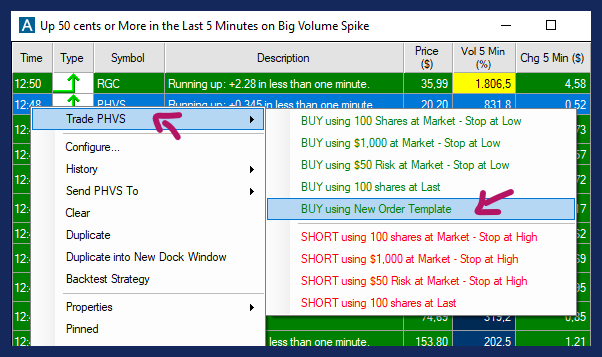
Once selected, your entry order will be sent directly to your brokerage with the configured Entry and Exit parameters.
Once executed, your trade will be displayed in the Positions Tab of Brokerage Plus.

A right-click on any of your positions in the Positions Tab of Brokerage Plus will bring up a menu enabling you to adjust your Stops and Targets.
Sample One-Click Order Template
A Sample One-Click Order Template for a Long Strategy could be set up as follows:
Name: Risk $100
Direction: Long
Account: Trade Ideas Simulated Trading
Start Time: 9:30
End Time: 16:00
Position Sizing based on Stop Loss, Dollars $100
Entry Order: Limit
Limit Reference: Last Price
Time in Force: GTD 3 minutes
Limit Offset: -0.02
Stop Loss: Dollars, Offset: 0.20
Target: Dollars, Offset: 0.40
Hold Time: None